

Elementor Pro – the most advanced website builder plugin for WordPress has time and time again surprised the users by adding numerous handy features to its design. One of the most sought after feature for the designers was the “Theme Builder”. Hopefully, the day has arrived and we have been graced with the option to use distinct templates for different parts of your website. Having access to such an easy-to-use tool vastly improves the pace of the website design. Long past are the days when we had to manually customize the design for each page. Remember the tediousness of adding a new blog post to your website for the n-th time? Fret not! The Elementor Pro “Theme Builder” is here and it is not going anywhere. Together we will cover the basics of the “Theme Builder” and see for ourselves how to best use it to its fullest capabilities.
What is the Elementor “Theme Builder”?
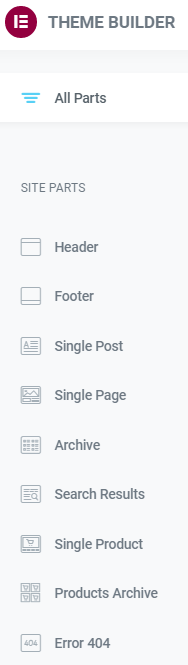
In its essence, “Theme Builder” is a tool which provides us with the ability to customize essential parts of our WordPress website without coding. For instance, Header, Footer, Posts, Popups, etc. can be easily tailor-made to your liking. Having access to such a powerful tool allows you to easily manipulate the design and layout for multiple pages on your website. Adding, editing and deleting parts of your site has never been easier.
On the one hand, “Theme Builder” can be used as a guide for navigating through different parts of the website. On the other hand, the design capabilities it offers to the user are almost limitless. Just as any feature, though, it takes time to get the hang of. By adding plugins to your WordPress website, you can greatly enhance the possibilities of the “Theme Builder”. Nowadays, there is a copious amount of plugins from which to choose from. Unfortunately, in this article we will not cover any of them. You can find information concerning plugins in our other blog posts.
Where can you find the Elementor “Theme Builder”?
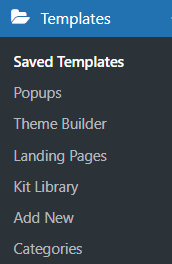
Let us start by finding out how to access the “Theme Builder” in Elementor Pro. There are several ways how a user can gain access to “Theme Builder”. Most users prefer to use the simplest method available to them. From WordPress admin menu you can see the “Templates” option available to you. By clicking on it, a dropdown menu will appear in which you will see the “Theme Builder”. After you click on it, you will see the “Theme Builder” window. Look how simple it is!
Another way to gain quick access to our favorite Elementor Pro feature is to use keyboard shortcut hotkey combinations on the WordPress admin panel. Keep in mind that Mac and Windows have different shortcuts. On a Mac, click “CMD+SHIFT+E” to instantly jump to the “Theme Builder”. On Windows, click “CTRL+SHIFT+E” in order to be taken directly to it. It is also useful to remember that you can jump quickly to the “Theme Builder” from any page or post in your website just by clicking the hamburger menu in the upper left corner of the “Widget Panel”.
What can the Elementor “Theme Builder” do?
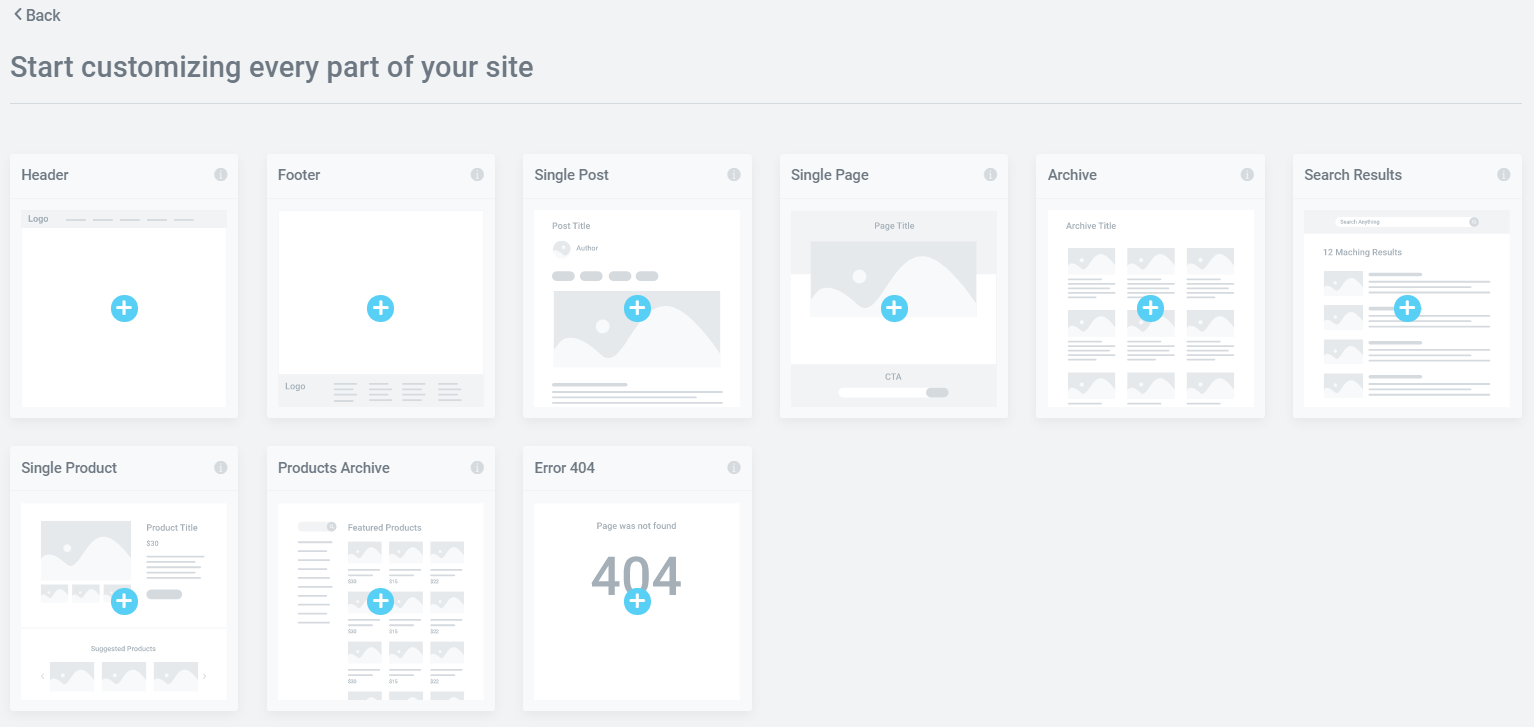
Now that we have located the “Theme Builder”, we can take a look at the plentitude of options we can conveniently gain access to. You may have already noticed that Elementor Pro has in-built free templates. Imagine the joy an average developer feels by having access to pre-made pages, blocks and other parts of site. With enough experience, you will be able to piece together your WordPress website in a matter of hours. At the time of writing this blog, Elementor Pro has more than 300 free templates for you to use. You must take into consideration the fact that an extensive amount of premium templates is available for purchase. But for a beginner, the free templates should prove enough.
Many developers and web agencies offer their own pre-made templates for you to download. It is beneficial to take a look at different designs and ideas as it will help you understand the many intricacies of web design. Thankfully, the Elementor Pro “Theme Builder” has blessed us with the option to import custom-made templates directly into our website. It is a highly appreciated tool among designers as it allows us to freely share and interact with the work of our colleagues. Then again, most designers and developers choose “Theme Builder” mainly because of its ability to create new templates from scratch.
The capability to edit an existing site parts conditions is an indispensable part of template creation. It allows you to set certain conditions for specific instances in which a particular template will be used on your website. Of course, by using the “Theme Builder” we improve the accessibility of our website from a web designer’s viewpoint. Now, let us take a look at some of site parts we can customize with “Theme Builder”.

Creating and Customizing Header
To begin with, click on the “Add New” button in the “Theme Builder” menu, it will create a fresh template. Furthermore, choose what kind of a template it will be, in this case we will create a new Header template. Choose a name for your template, publish it and get ready to design your own custom Header. Now you can start editing your Header directly by using Elementor Pro.
Designing your header works the same way as any page or section with Elementor Pro. Feel free to experiment with various widgets and designs in order to achieve your intended goal. You might get overwhelmed by the sheer possibilities of Elementor Pro widgets and prospects they offer, so we will list a few of the most useful ones:
- Site Logo
- Site Title
- Nav Menu
- Search Form
- Sitemap
- Page Title
With these widget options you can build any kind of header you want. As you will delve deeper into the world of a web designer you will get familiar with numerous plugins that can greatly enhance your capabilities in designing a custom header. Now, once you click on the “Publish” button, you will be asked to select the display conditions. Display conditions is an option that allows you to select precisely where in your WordPress website the Header will be located.
Creating and Customizing Footer
In a similar way, we can create and customize Footer for our WordPress website. The first few steps are the same as in the previous paragraph. Only instead of choosing Header, you will choose Footer as your new template type.
There is a misconception that footer is not as important as other parts of the website due to the fact that it is located at the very bottom of the page. Many designers endow only a fairly marginal attention to the Footer. But you should take into account the quantity of information that a well-designed Footer can provide to the user, not to mention that Footer, just as Header, is a part of the page that repeats itself on every page on the site. It can display useful and important information, such as:
- Terms and Conditions
- Copyright information
- Sitemap
- Website Navigation Links
- Contact Information
- Newsletter registration
- Maps
Though, in regards to design, Elementor Pro does not provide as many specified widgets to Footer as it does to Header. But it still offers you a plentitude of widgets from which to choose from. Keep in mind that Footers as well as Headers vastly change the dimensions of elements when viewed from a tablet or mobile device. Thankfully, Elementor Pro has a built-in responsive mode, which enables you to freely customize our Header and Footer dimensions for every device. Just click on the “Responsive Mode” button underneath the widgets sidebar and feel free to re-design it to your hearths content.
Tips and Tricks for Maintaining a Consistent Design
In the same manner you can create any other type of page for our website. By now you must have grasped the basic concepts of template creation. In this paragraph we will focus more on certain tips and tricks you can employ in order to maintain a consistent design throughout your webpage. Fortunately, Elementor Pro “Theme Builder” has made it easier than ever to maintain consistency in web design. Why having a coherently designed website is so important? Let us take a look at benefits that a harmoniously constructed website may bring about:
- Improves readability and usability
- Enables users to carry out tasks more efficiently
- Saves money and time during the design process
- Provides users with a positive experience
- Illuminates key content in the website
- Eliminates burdensome navigation
- Clear and concise view
As you can see, the perks are obvious. By designing a user-friendly website, you will be able to greatly improve the performance of your site. Even simple visual cues, like properly placed “submit” buttons or structurally placed navigation links, can help visitors find the information they need swiftly and effortlessly.
Think about who your customers are, what is their goal when visiting the site, how will they interact with the site and how can you improve your website so it can be made highly accessible to them. For instance, by using the Elementor Pro “Theme Builder” you can conveniently preserve identical page layout for your website. Let us give an eye to site parts and elements that like to appear the same way throughout the website, for example:
- Menu should keep the same position
- Fonts and colors
- Clear hierarchy of the website
- Think about the placement of marketing elements
- Check if all links are responsive
- Emphasize your corporate brand
You should take into account how the sites content interacts with the design you want to use. For example, having too much content on your landing page renders the information inaccessible for the user. Paragraphs become cluttered, different columns become indistinguishable from one another and so forth. In order to separate blocks of content elements like Headings and Subheadings are of great help. Links leading to different parts of the site help divide sections. The possibilities are endless. As you develop your skills overtime, you will gain a better understanding about the complex nature of web design. There is no better teacher than experience!
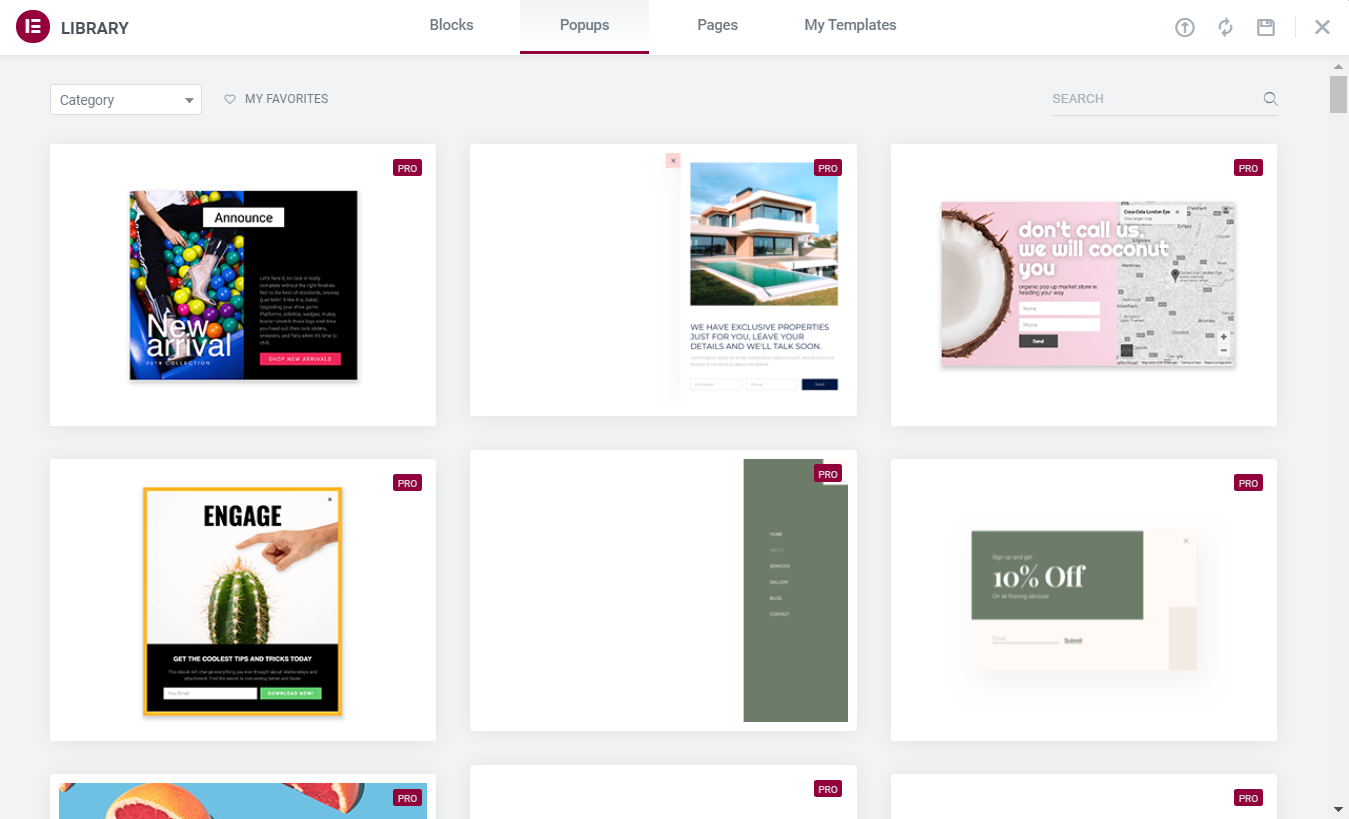
Popups
New feature, that was only recently added to the Elementor Pro, is the ability to create templates for Popups. You will not be able to find an option for it in the “Theme Builder” menu, though. The “Popups” button is located just above the “Theme Builder” button in your WordPress admin panel underneath the “Templates” dropdown menu. Why is it such a big deal? Well, such a powerful marketing tool should not be taken lightly. When designed properly and placed prudently, popups can help illuminate content that otherwise would be lost in the flow of the site.
From a user’s perspective, popups are highly irritating, but web designer is a cunning beast and has found many workarounds. For instance, let us take a look at the “Exit Intent Popup”. It is a technique used mainly in online shops to retain visitors from leaving the site. Visitors mouse movements are tracked and when the cursor relocates outside the page boundaries, a popup is shown. From marketing team’s viewpoint, such a popup can lead to direct increase in sales. The sudden promise of a discount or notification for an upcoming sale may catch a customer’s eye and make him linger in the online store just a bit longer.
Do not get carried away, though. Google has started to penalize sites with poorly implemented popups. Popups that obscure the sites content are considered meddlesome. Thankfully, with the “Theme Builder” it has become incredibly easy to customize the popup design and their placement across the website. Feel free to experiment with various designs and layouts so you get the feel for what a well-devised popup looks like.
Final Words
In conclusion, Elementor Pro “Theme Builder” immensely revamps how a web designer interacts with the website during its creation. Having access to such an efficient and simple tool will allow you to substantially increase the development speed of your website. Being able to see the finished product instantly without coding is a gargantuan benefit. By easing our workload, we can save time and valuable resources. You should use all the assets Elementor Pro provides you with. Remember the tips and tricks we talked about and use them according to the circumstances. Stay tuned for more blogs and tutorials, cheers!


