

The old scrolling technique is pretty boring, right? SO, you might want to add a new way to scroll. For that, you can add Elementor next section scroll. Now, there are many misconceptions here. Some people want a link from which the users can scroll to any section whereas some people want a side panel from which the user can select a dot to scroll (just like you see the navigations dots in the slider). We will see both of them here.
Creating Elementor next section scroll with Links
Now, you might have seen many blog pages where you have seen a button that says “Contact” and when you click on it, it will scroll you to the last section that is for “Contact”. This can be archived by the anchor menu.
Many people might also want to add Elementor next section scroll just like this. SO, we will also talk about it here. The positive thing is that here you won’t need any third-party plugin. You can directly start using Elementor and all the options are available there. So, you can set the anchor menu as well as the button using the Elementor plugin.
The method is short and won’t consume a lot of time. Let’s get started with the method and see how you can do it.
Naming the Section
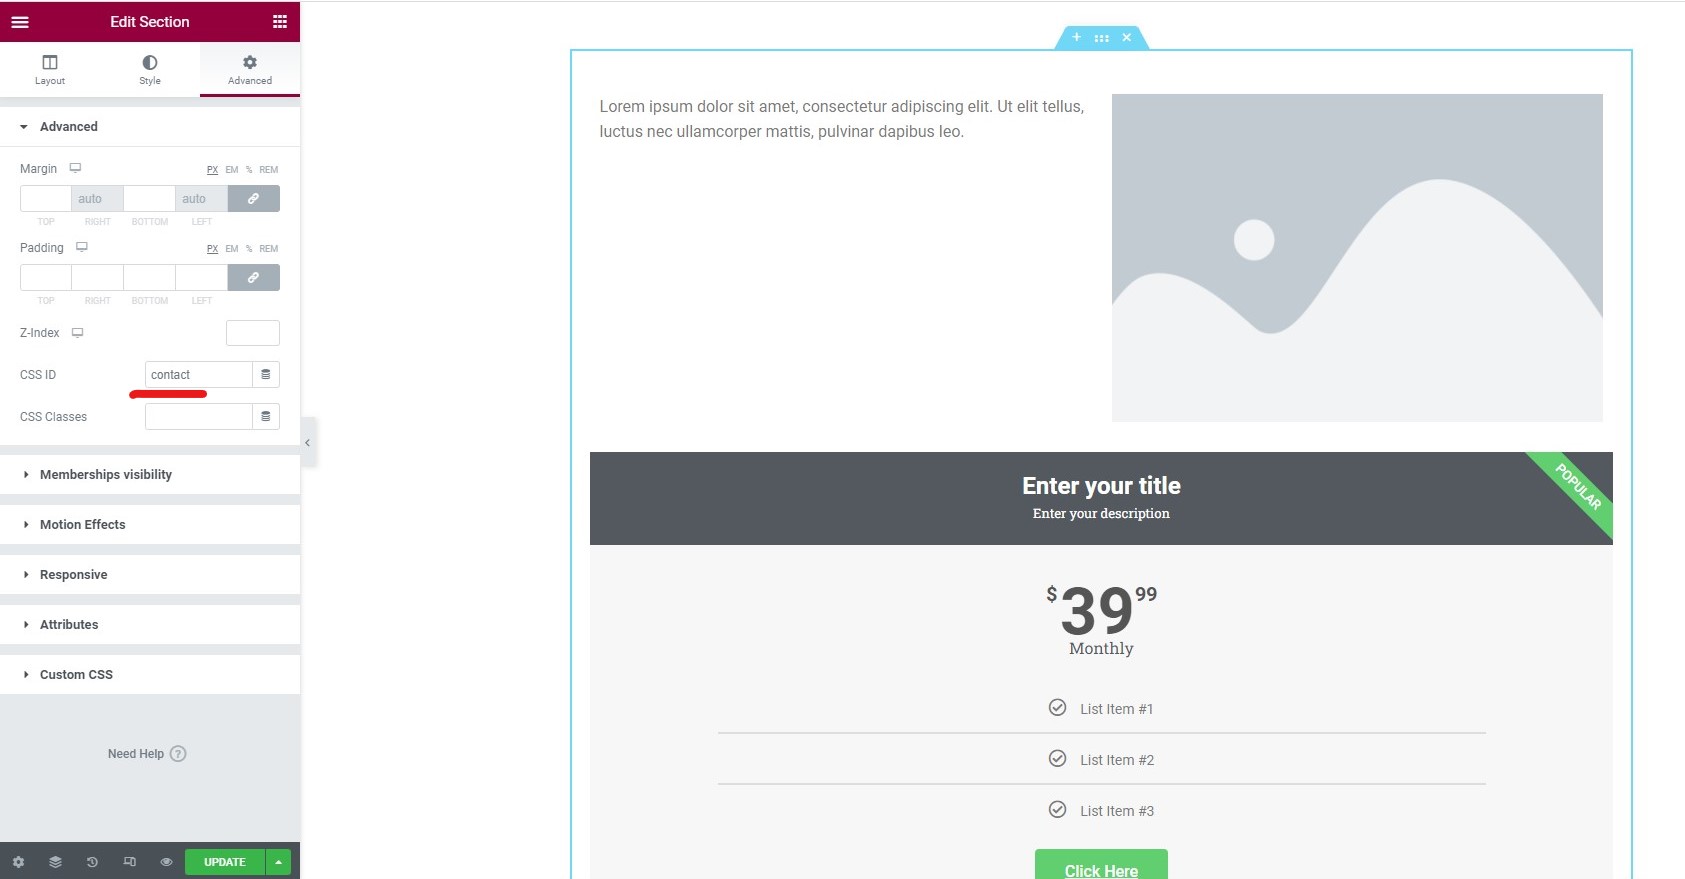
We will have to name the section first. If you want to scroll to the contact section, you will have to scroll down to the contact section in Elementor. In simpler words, you can open the page, edit it with Elementor and then head over to the contact section.
Now, you need to create a blank section above the contact section. Please note that we are just taking an example of the contact section. It could be any section where you want to scroll.
In the new section, we will add a widget called the Anchor menu. You will find it in the widget box which is the left panel in Elementor.
You can simply drag and drop it.
Thereafter, you will have to name the section. The anchor menu’s configuration will just have one field that is where you need to enter the name of the section. You can enter any name you want. Just make sure that you remember the name as it is. You will need this name in the future. So, make sure that the name is easy to remember and you know it well.
Most people name it exactly what the section represents. So, if the section represents the contact section, you can name it to contact. Thereafter, you can save the changes.
Linking the Section
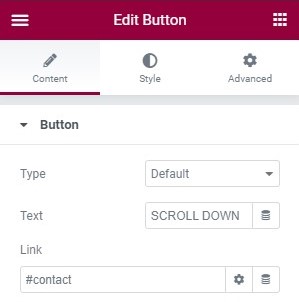
The next part is where you will have to link the section. You can easily link the section to this.
To link your section and add the Elementor next section scroll, you will have to first create the link. You can create a hyperlink or you can also create a button from here. It’s surely your choice.
The main game starts when you are entering the link. In the link, you will have to enter the name of the section that we just created. In front of that, you will have to add “#”.
So, if you have created a contact section and have named it “contact”, you will have to enter the link name as “#contact”.
You don’t need to add anything above it. It will directly scroll to the section
The good thing here is that you can even add the anchor menu links to the menu. If you want to add the contact in the main navigation of the menu, you can add it there too. It will then directly open the contact section. When the user will click on it, it will give Elementor the next section scroll effect, and then the user will land directly on the section.
You can create as many sections as you want. Just make sure that the anchor menu names are unique.
Elementor next section scroll-like Slider
The first method is all about having a slider-like page. You will see one section on the screen. On the side, you will see the dots which can help the users scroll to another section. You might have seen similar things in a Slider. We will do the same thing here.
For that, we will have to use a third-party plugin as this is not possible directly with the help of Elementor. However, Elementor will be our base plugin. So, you will have to ensure that the Elementor plugin is installed and then you can do the following things. This is how you can get things started.
Now, we will talk about the name of the plugin and how you can start changing things.
Plugin for Elementor next section scroll
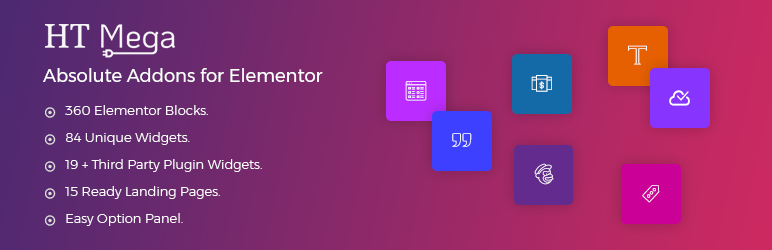
The plugin we will use for Elementor next section scroll is HT Mega. It’s a free plugin that you will find in the WordPress plugin directory itself. You can simply head over to the plugin directory and search for the plugin.
It’s not just the plugin for Elementor next section scroll. Instead, it’s a full add-on pack for Elementor. There are many great addons that you can use here. Flip box, double button, image magnifier, and some of such add-ons are the popular addons that you will find in the plugin.
Therefore, you can always start using the plugin to get started. The best thing about the plugin is that you can choose which addons you want to activate. This will use less memory on your server. So, you are at the advantage here.
Now, coming back to the point, if you want to activate Elementor next section scroll, you will have to first install the plugin. You can do it by heading over to the WordPress plugin directory and then searching for the plugin. You can look for HT mega and install the first plugin that comes. It’s an add-on plugin for Elementor. So, make sure that Elementor is installed and is activated.
Once you are there, you can follow the next steps to create Elementor next section scroll.
Activate the Module
You might have already activated the plugin. Now, you will have to activate the module. Like we have mentioned earlier, there are many addons here that you can use. You only need to activate the one that you want.
For that, you can head over to the HTMega Addons menu in the dashboard. Inside it, you will have to click on the Settings option. Now, you can head over to the Elements tab. The Element tab of settings will allow you to activate the Elements and start making the changes as per your choice.
You can activate the modules that you want and deactivate the ones that you don’t want. You need to activate “Scroll navigation” here. You can simply enable it and that’s it.
The next step is to start using it.
Create a New Elementor Page
Now, you will have to create a new blank Elementor page. Don’t add anything yet. You can simply select the blank page. One of the things that most people do here is selecting the full canvas page. You can do that too.
On the other hand, if you want the menu to show as it is, you can keep the menu. You can select the one that you love as per your wish.
Don’t add anything else here. We will keep it blank and then add the Elementor next section scroll before we add the elements.
Add the Elementor next section scroll
Now, you will have to open the left menu in Elementor where you find all the plugins. You will have to look for Scroll Navigation here. If you can’t find it directly, you can simply search for it.
Once you find the widget, you will have to drag the widget and then add it to the page.
You can add it on top of the page. Don’t create any section or column yet. You can simply drag and drop it on top of the page. If you have the menu enabled on the page, you can paste it below it.
On the other hand, if you have a blank canvas, you can add it to the top. Don’t add the content yet. We will talk further about how you can add the content.
Adding the Content
The next step is where we will add the content. You just need to click on the Scroll navigation widget that we just added above. When you click on it, you will see a few sections that you need to see.
In the Scroll Navigation, you will see a few fields that you enter. These are the sections.
You can click on the first field and give it any name. You will see a drop-down field that says “Content Source”. We will keep it as a custom for a while. Inside it, you will have to add the content right there. It will show you the editor where you can add the text, media, or any HTML code.
Many people want to add Elementor content here instead of adding random custom content. For that, you can select Elementor Template as the content source from the drop-down. You can select the Template you want to add.
Many people don’t have the Elementor content but they want to add a custom element. For that, you will have to create an Elementor template. Let’s talk more about it.
Creating Elementor Template
We will create an Elementor template for Elementor next section scroll. To begin with, you can create a blank page. Make sure it’s a completely blank page with no menu.
You can add all your content here. It’s just the content of one section and not the entire page. For instance, if you want one section of Elementor to be the “About us”, you can just add the about content here.
Thereafter, you can click on the up arrow near the save button. You will get the option to save the page as a template. You can save it as a template from there. Now, you can give it a name that you can understand. The best name would be to name as it as a section. For instance, if you have to create an about section, you can name it the about section.
In the same way, you need to create all the sections. For that, you will have to create a template file for all the sections. Make sure every section is in the new template. So, if you want to have 5 Elementor next section scroll, you can create 5 different Elementor templates. Make sure the names are unique and easy to understand which template it is.
Thereafter, you can set it in the Elementor next section scroll.
Configure the Scroll Widget
Thereafter, you can set the section in the scroll navigation. You can open the previous tab and set the source as Elementor template. Thereafter, you can select the template that you want to set.
For the next section, you can add a different field.
Save and publish the changes. Now, you can test the page to see if everything is working as per your requirement.
Final Words
To conclude, this was all about Elementor next section scroll. We saw two main ways using which you can add Elementor next section scroll. Both of them are different. Depending on your requirements, you can choose the one that suits you. It’s also recommended that you don’t use both of them together as it will leave users in confusion. You can surely add more effects if you are using the first trick. Things like parallax effects can also be added to the page to make it more interactive and interesting. Elementor has a lot of features that you can check out.


